Ever watched a photo and wished the subject could break free from the frozen frame? Maybe you have a portrait of a friend, a beloved character design, or a product shot that would be so much more compelling if it moved — a subtle turn of the head, a flowing piece of fabric, or the natural sway of a walking stride. For most people, making a still image move has always felt like something reserved for Hollywood studios with massive budgets and years of technical training.
That has changed. In 2026, motion transfer AI has completely rewritten the rules. What once required expensive motion-capture rigs, complex 3D software, and professional animators can now be done from your browser. With a capable motion transfer ai free online tool, you can take a single still image and apply realistic movement to it in minutes — no technical background, no software installation, and no upfront cost.
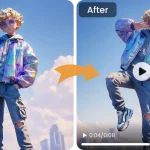
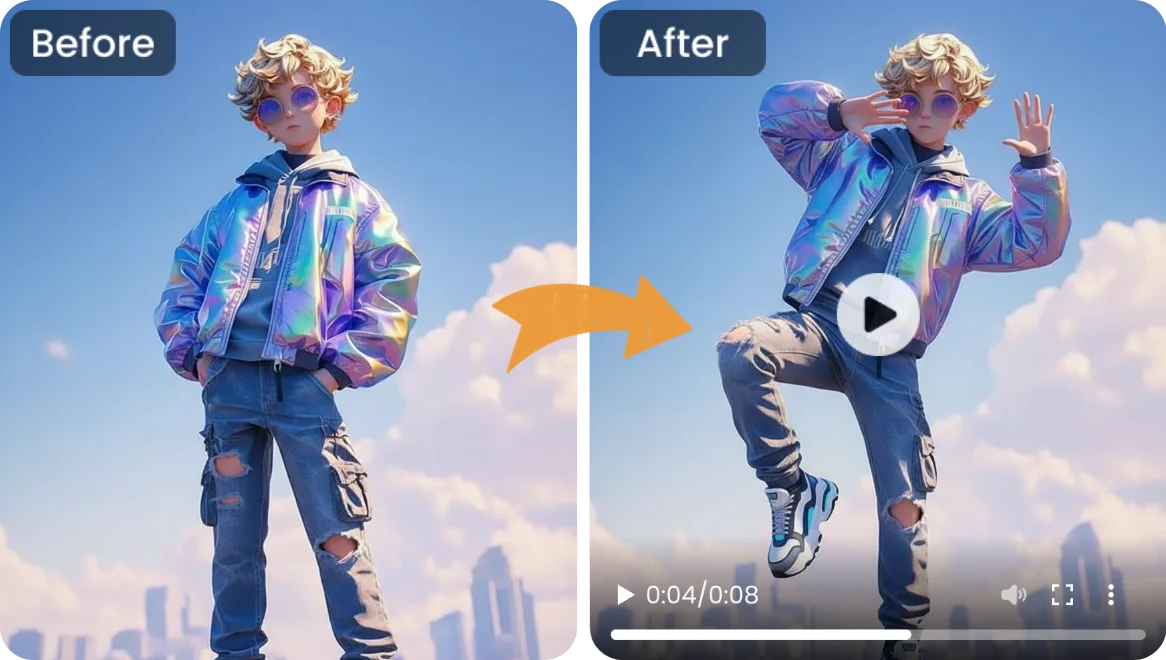
The idea is simple: you provide a subject image and a motion source video, and the AI maps the movement onto your still frame. The result is an animated clip where the subject moves naturally — a character that walks, a portrait that turns its head, a piece of fabric that flows. What used to take days now takes minutes. In this guide, we will walk through everything you need to know to start creating your own motion-transferred animations, from how the technology works to generating your first clip in under ten minutes.
Why Use Motion Transfer AI?
Motion transfer AI has transformed how creators, small businesses, and hobbyists approach animation. Here is why the technology deserves your attention.
First, the accessibility is remarkable. The old animation pipeline — capture motion data, rig a 3D model, map textures, render frames — could take days for a few seconds of output. With motion transfer AI, you upload two files and the AI handles the mapping. You do not need to understand keyframes, bone rigging, or rendering engines. If you can drag and drop a file, you can create motion.
Speed is the second advantage. A typical motion transfer runs in one to three minutes. Compare that to the hours or days a manual animation workflow demands, and the productivity gain becomes obvious. For a content creator posting daily, a marketer running a campaign, or a hobbyist experimenting with ideas, that turnaround time is the difference between using the tool and abandoning it.
Then there is cost. Professional animation software licenses run hundreds of dollars annually. Hiring a freelance animator for a short clip can cost anywhere from fifty to several hundred dollars per second of output. The free tier of a motion transfer AI tool — where you earn daily credits through a simple check-in — eliminates that financial barrier. You can test ideas, build drafts, and use your creations for personal projects without spending a dime.
Your Best Option for Motion Transfer AI
Among the growing list of AI animation platforms, one tool consistently delivers where it counts: balancing simplicity with genuine creative control.
What sets it apart is the breadth of motion sources you can use. Rather than being limited to a handful of preset animations, you can upload your own driving video — someone dancing, a flowing curtain, leaves rustling in the wind — and map that movement onto your subject image. This opens up creative possibilities that preset-only tools cannot match. You are not picking from a menu; you are directing the motion yourself.
The free tier operates on a daily check-in credit model, which means you can return each day, claim your free credits, and keep creating without ever reaching for a credit card. Free outputs carry a small watermark, which is perfectly fine for drafts, practice runs, and personal sharing. When you need watermark-free results — for client work, commercial projects, or polished portfolio pieces — upgrading to a paid plan removes the watermark and gives you full commercial usage rights.
How to Create Motion Transfer Animations: A 5-Step Guide
The process of turning a still image into a moving animation might sound technical, but it is surprisingly straightforward. Here is exactly how it works.
Step 1: Choose Your Subject Image
Start with the image you want to animate. Portraits work particularly well — the AI excels at mapping facial and body movements. Character illustrations, fashion shots, and product images with a clear subject against a defined background also produce strong results. The cleaner your subject stands out from its background, the more natural the motion will look. Avoid images where the subject is heavily obscured, blurry, or merged into a complex background without contrast.
Step 2: Pick or Upload a Motion Source
This is where the magic happens. Your motion source is a video that defines how your subject will move. You can use a preset animation from the platform — a walking cycle, a head turn, subtle idle movement — or upload your own video for custom motion. A clip of someone nodding thoughtfully, for instance, becomes the movement template for your still portrait. The more closely the body position in the motion source matches your subject image, the more convincing the result.
Step 3: Let the AI Process the Transfer
Once both inputs are uploaded, the AI gets to work. It analyzes the pose and structure of your subject image, extracts the motion pattern from your driving video, and applies that movement to the still frame. Processing typically takes a couple of minutes depending on the resolution and clip length. The heavy lifting happens on cloud GPUs, not your local machine, so your device’s performance is not a limiting factor.
Step 4: Review and Refine
When processing completes, you will see your animated result. The first output may not be perfect — that is entirely normal. Pay attention to how smoothly the subject transitions through the motion. If something looks off, try a different motion source video or use a subject image with a more neutral pose. Small adjustments to your inputs can dramatically improve the final animation. Iteration is part of the creative process, and the free daily credits make it easy to experiment without pressure.
Step 5: Download and Use Your Animation
Once you are happy with the result, download your animated clip. On the free tier, your output will include a small watermark — ideal for sharing drafts, testing concepts, or posting casually on social media. If you need a clean, watermark-free file for a client deliverable, a commercial campaign, or your professional portfolio, upgrading unlocks watermark removal and full-resolution downloads. Your final animation can be used across social platforms, embedded in websites, added to presentations, or incorporated into video projects.
Creative Ways to Use Motion Transfer AI
Wondering what you can actually make with this technology? Here are four real-world applications to get your imagination going.
Social Media Content That Stops the Scroll
Static posts blend into the feed. A subtle motion animation — a portrait with a gentle head turn, a product image with a 3D-like sway — grabs attention instantly. For Instagram Reels, TikTok, and YouTube Shorts, even a 5-second motion transfer clip layered with text and music can dramatically outperform a still image.
Character Animation for Indie Creators
Illustrators, comic artists, and character designers can bring their creations to life without learning 3D rigging. Upload your character art as the subject, select a walking or gesturing motion source, and watch your drawn character inhabit real movement. It is an affordable way to produce animated shorts, storyboard concepts, or proof-of-concept clips.
E-Commerce Product Showcase
A rotating product shot used to require a turntable and a studio setup. Now you can upload a single product photo and apply a gentle rotation or floating motion. The result gives online shoppers a richer sense of the product than a flat image ever could — and it takes minutes, not hours.
Personalized Gifts and Greetings
Animate a family portrait, make a pet photo wag its tail, or turn a friend’s selfie into a dancing clip. These are the kinds of personalized creations that get shared in group chats and family threads long after a standard greeting card would be forgotten.
Tips for Better Motion Transfer Results
- Start with clean, well-lit subject images. The AI maps motion more accurately when your subject is clearly separated from the background. Good lighting and minimal clutter go a long way.
- Match the pose to the motion source. If your driving video shows a person turning to the right, use a subject image where the person is facing forward or slightly left — the transition will look far more natural.
- Use short motion clips for testing. A 2–3 second driving video is enough to evaluate whether the pairing works before committing to a longer render.
- Experiment with different motion styles. Try subtle idle movement for professional portraits, dynamic dancing for fun social content, and flowing motion for fabric or hair shots.
- Build a library of favorite motion sources. Once you find driving videos that produce consistently strong results, save them. Reusing proven motion sources across projects builds consistency and saves time.
Common Mistakes to Avoid
- Using blurry or low-resolution subject images. The AI needs clear visual information to track features and apply motion. Garbage in, garbage out applies here too.
- Expecting Hollywood-level output on the first try. Motion transfer is powerful but not magic. Treat the first result as a starting point — refine your inputs and iterate.
- Mismatching subject and motion scale. A full-body dance video driving a close-up portrait often produces unnatural stretching. Match the framing of your subject to the framing of your motion source.
- Skipping the free daily credits. Even if you are just curious, checking in daily builds up a reserve that lets you experiment freely without ever paying.
Frequently Asked Questions
Is motion transfer AI really free to use?
Yes. The platform offers a free tier with daily credits you claim through a simple check-in. Free outputs include a small watermark. For watermark-free results and commercial usage rights, a paid plan is available.
Do I need any technical or animation skills?
None at all. The entire process consists of uploading an image, selecting or uploading a motion source, and waiting for the AI to process. If you can use a web browser, you can use motion transfer AI.
Can I use my animations for commercial projects?
On the paid tier, yes — watermark-free outputs come with full commercial usage rights. Free-tier outputs with the watermark are best suited for drafts, personal projects, and casual social sharing.
How long does motion transfer take?
Most transfers complete in one to three minutes depending on clip length and resolution. Processing runs on cloud servers, so your device’s performance is not a factor.
What types of images produce the best results?
Portraits, character art, and images with a clearly defined subject against a clean background produce the most convincing motion. Images with heavy clutter or multiple overlapping subjects are harder for the AI to parse cleanly.
Your Motion Transfer Journey Starts Now
Motion transfer AI has opened a door that was locked for decades. What once demanded a studio, a team, and a serious budget is now available to anyone with a web browser and a creative idea. You do not need to be an animator, a video editor, or a technical expert — you just need an image and the willingness to experiment.
The daily free credits mean there is no risk in trying. Upload a photo, apply some motion, and see what happens. You might be surprised at how quickly a still frame becomes something alive. Start experimenting today — your images have been waiting to move.